- Login to your Azure subscription
- In top left (Portal menu), select Security Center
If Security Center is not there, select All services and select from there  Image Added Image Added
Note:In previous version of Azure this Portal menu is already docked and Portal menu (3 bars) is not available)
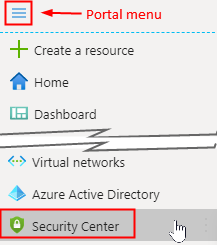 Image Modified Image Modified
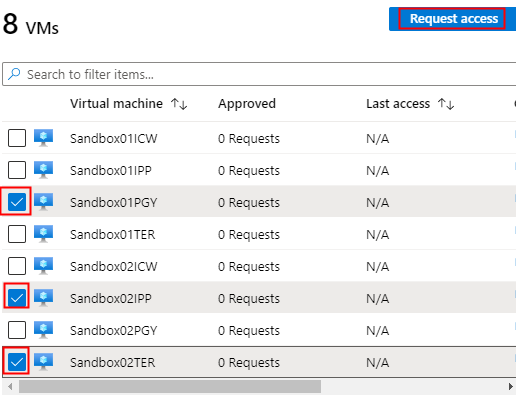
- In Security Center | Overview menu under ADVANCED CLOUD DEFENSE, select Just in time VM access
Note: all subscription VMs should be listed on main (right-side) menu
- Check VM(s) needed access and click on Request access (on right – top of the VMs list)
- On the Toggle column, click On for each server (Port 3389)
Note: the following steps assume that the access is given to user(s) for the internal (private) IP address or subnet ranges
- Enter IP addresses or subnet ranges and click Open ports (bottom right)
- After the request is processed (this may take several minutes), the VM server(s) selected in step 4 will be available for RDP
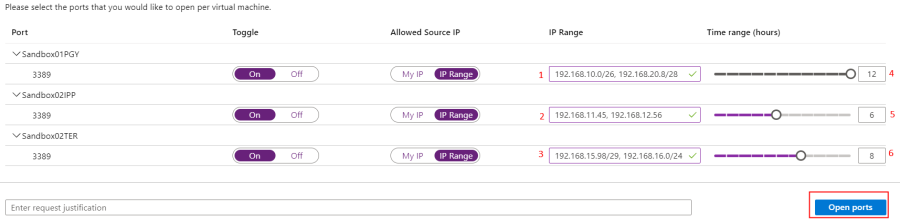
Important Note: Selecting My IP (in Allowed Source IP column) is selecting your client machine internet facing IP, not your company (VPN) private IP address
Explanation of IP ranges column:
It is not typically set this way, but for the purpose of (IP Range) usage, here is what allowed. You can have more than two entries per line separated by comma (","):
1 – Multiple different subnets
2 – Specific IP addresses
3 – Allows 6 IP addresses starting at .98. Entire (all 254 hosts) of different subnet.
Explanation of Time range (hours) Column:
Again, it is not typically set this way, but for the purpose of (Time range) usage
4 – Default range – this port will be open for the next 12 hours
5 – Open for next 6 hours only
6 – Open for next 8 hours only |